Introduction
Polycarbonate (PC) stands at the pinnacle of FDM 3D printing materials when it comes to strength, temperature resistance, and engineering performance. Unlike the more common PLA and PETG, polycarbonate is a true industrial-grade thermoplastic capable of withstanding high temperatures, significant mechanical stress, and demanding environments. When printed correctly, PC parts can replace machined components in functional prototypes, automotive applications, and even some end-use products.
This definitive 2026 guide covers everything you need to master polycarbonate 3D printing. We’ll explore PC’s remarkable properties, compare variants and blends, recommend the best brands (Prusa, Polymaker, Bambu Lab), provide precise print settings for consistent results, and identify use cases where PC truly outshines other materials. Whether you’re upgrading from ABS or seeking a material that can handle real-world engineering demands, understanding polycarbonate is essential.
Note: PC is often blended with ABS (PC-ABS) or other polymers to improve printability while retaining PC’s excellent properties. Pure PC is challenging to print and rarely used; most consumer PC filaments are modified blends that balance performance with printability.
Understanding Polycarbonate: Material Science
Polycarbonate is a thermoplastic polymer containing carbonate groups in its chemical structure. This unique molecular arrangement gives PC its characteristic combination of transparency (in its pure form), high impact resistance, and thermal stability.
PC vs PC-ABS vs PC-Blend
Pure Polycarbonate: Extremely difficult to 3D print due to poor layer adhesion, significant warping, and poor bed adhesion. Not recommended for typical FDM printers without significant modifications. Used primarily in industrial extrusion and injection molding.
PC-ABS (Polycarbonate-Acrylonitrile Butadiene Styrene): A copolymer blend that combines PC’s strength and heat resistance with ABS’s easier printability. This is the most common PC filament for 3D printing. Trade-off: slightly lower heat resistance than pure PC but much more manageable.
PC-PETG Blends: Emerging variants that aim to combine PC’s mechanical properties with PETG’s easier printing characteristics.
Polycarbonate with Modifiers: Most commercial PC filaments include additives to improve adhesion, reduce warping, and enhance UV stability. These proprietary blends are what you’ll typically find from brands like Prusament PC Blend, Polymaker PC, and Bambu Lab PC.
Why Choose PC Over Other Materials?
Polycarbonate fills a critical gap in the 3D printing material stack:
- Higher temperature resistance than ABS, PETG, and nylon (continuous use ~120-130°C)
- Greater impact strength than all common FDM materials
- Higher tensile strength than PETG and most nylons (60-70 MPa typical)
- Good chemical resistance (though not as good as PEEK or PPS)
- Rigidity and stiffness superior to flexible or semi-flexible materials
- Can be transparent in pure form (though most PC filaments are opaque/colored)
- Tensile Strength: 60-70 MPa (depends on blend and print orientation)
- Flexural Strength: 90-110 MPa
- Flexural Modulus: 2000-2400 MPa (stiffer than PETG and nylon)
- Impact Resistance: 600-800 J/m (notched Izod) — exceptional among thermoplastics
- Elongation at Break: 10-30% (varies by formulation)
- vs ABS: PC has ~30-40% higher tensile strength and significantly better impact resistance
- vs PETG: PC is ~30% stronger, much stiffer, and can handle ~50°C higher temperatures
- vs Nylon: PC is stiffer but less flexible; nylon has better fatigue resistance and lower moisture sensitivity
- vs ASA: PC is stronger and more temperature resistant; ASA has better UV stability
- Glass Transition Temperature (Tg): ~150°C (varies by formulation)
- Heat Deflection Temperature (HDT): 125-140°C at 0.455 MPa (typical for PC blends)
- Continuous Use Temperature: Up to ~120-130°C
- Melting Point: Varies; modified PC blends often around 230-260°C
- Chemical Resistance: Good resistance to oils, greases, aliphatic hydrocarbons, and many dilute acids. Swells in aromatic hydrocarbons, ketones, and some chlorinated solvents. Not suitable for prolonged chemical exposure without testing.
- Density: ~1.2-1.3 g/cm³ (similar to ABS)
- Flammability: Self-extinguishing but still flammable; UL94 V-0 rating possible with additives
- Transparency: Pure PC is optically clear; most PC filaments include pigments/ additives that render them opaque
- Bubbles and steam pockets during printing
- Reduced interlayer adhesion
- Surface quality degradation
- Severe Warping: Large parts will lift from the build plate, especially corners. Shrinkage rates of 0.5-0.8% combined with high Tg cause dramatic thermal stresses.
- Chamber temperature maintained at 60-70°C during printing
- All sides enclosed, including top
- Heated chamber preferred (actively controlled temperature)
- Good passive airflow to prevent overheating of electronics
- PEI sheet (textured or smooth) — excellent adhesion, reusable with proper care
- Clean with isopropyl alcohol before each print
- Ensure surface is perfectly level and nozzle distance is calibrated (first layer squish is critical)
- Consider “squish” of 100-125% first layer height for better adhesion
- Brim: 5-10mm brim dramatically improves corner adhesion; remove after print
- Raft: Use only as last resort; hard to remove and wastes filament
- ABS slurry/ juice: Some users apply ABS dissolved in acetone to bed for exceptional stick
- Masking tape + glue stick: Sometimes helpful for very large prints
- PC-ABS blends: 260-280°C typical
- Modified PC (Prusa, Polymaker): 270-285°C
- Start at manufacturer recommendation and adjust ±5°C based on results
- Retraction Distance: 3-5mm (shorter than PLA due to high melt viscosity)
- Retraction Speed: 30-50 mm/s
- Coasting: 0.2-0.6mm may help reduce stringing
- Wipe: 2-4mm can improve quality
- Z-hop: Generally not recommended; can cause nozzle collisions on high-first-layer
- Outer Wall: 30-50 mm/s
- Inner Wall: 40-60 mm/s
- Infill: 40-70 mm/s
- Top/Bottom: 25-40 mm/s
- Travel: 100-150 mm/s
- First 2-3 layers: 0% (or fan off)
- After first layers: 0-30% max
- Higher cooling causes layer separation and poor bonding
- Layer Height: 0.2-0.3mm (typical); can go up to 0.4mm for strong, fast prints
- Extrusion Width: 110-125% of nozzle diameter (over-extrusion improves bonding)
- First Layer Height: 100-120% (more squish helps adhesion)
- First Layer Speed: 15-25 mm/s
- Pressure Advance/Linear Advance: Essential for PC. Values 0.05-0.20 (direct drive) eliminate corner blobs and improve quality. Test thoroughly.
- Input Shaping: Can help reduce vibrations at higher speeds
- Bezier Curve / Arc Welder: Recommended to smooth G-code and reduce corner acceleration issues
- Max Volumetric Speed: PC needs lower max volumetric settings (12-15 mm³/s typical) due to high melt viscosity
- Dry before use if not stored in airtight dry box
- Temperature: 80-90°C for 4-6 hours
- Moisture content >0.2% will cause issues
- All-metal hotend required (PTFE-lined hotends cannot reach 280°C+)
- High-temperature capability: 300°C+ minimum
- Steel or hardened steel nozzle (brass works but will wear faster, especially with filled PC)
- Heated bed (mandatory) capable of 120°C+
- PEI sheet, glass, or Garolite build surface
- Rigid, enclosed frame to contain heat
- Draft-free environment
- Electronics outside enclosure or rated for high temperature
- Ensure heaters can maintain temperatures; bed particularly draws significant power
- Ensure enclosure is closed and reaching 60-70°C chamber temperature
- Increase bed temperature to 120-125°C for first layer, then 110-120°C
- Use brim (10-15mm) or “raft” for large parts
- Clean build surface thoroughly with isopropyl alcohol
- Check bed leveling — first layer squish must be perfect
- Apply Magigoo PC or PVA glue stick for extra adhesion
- Reduce print speed to allow more time for layers to bond
- Increase nozzle temperature by 5-10°C (test up to 295°C)
- Ensure enclosure ambient temperature is 60-70°C minimum
- Reduce cooling fan to 0%
- Slow print speed (outer walls particularly)
- Increase extrusion width (115-125%) for stronger interlayer bonding
- Verify filament is dry
- Enable and tune retraction: 3-5mm at 30-50 mm/s
- Enable coasting (0.2-0.6mm)
- Enable wiping (2-4mm)
- Reduce print temperature by 5°C (but stay above manufacturer minimum)
- Ensure nozzle is clean and not partially clogged
- Check for moisture in filament
- PC is prone to clogs if temperature is too low or retractions too long
- Use hardened steel nozzle (brass will degrade, especially with filled PC)
- Raise nozzle temperature to 295°C+ temporarily to clear
- Perform cold pull with PETG or Nylon
- Shorten retraction distance to 3mm
- Check filament path for heat creep (ensure heatsink is cool)
- Bed may not be truly level — check corner adhesion uniformity
- Ensure build surface is perfectly clean and free of oils
- Try different build surface: Garolite or PEI work best
- Apply brim or “raft” for critical parts
- Reduce first layer speed to 15-20 mm/s
- Verify first layer extrusion width is increased (120-125%)
- Lower fan speed on first layer to zero
- Mechanical enclosures that must fit together precisely and withstand handling
- Gears, pulleys, and drive components that experience high loads
- Motor mounts, brackets, and structural supports for robotics and machinery
- Automotive interior parts (dashboard components, brackets, covers) where temperature stability matters
- Custom fixtures and jigs that see repeated use in manufacturing
- Consumer product components where durability is critical (tool housings, protective cases)
- Light-duty decorative hardware (door handles, light switch plates, brackets)
- Drone and RC vehicle parts that need high strength-to-weight ratio (though CF-nylon may be lighter)
- Low-volume manufacturing of functional components
- Replacement parts for machinery where original part is no longer available
- Prototyping consumer products that will eventually be injection molded in polycarbonate or PC-ABS
- Tooling and molds for low-temperature materials (urethane, silicone)
- High-temperature applications (>130°C): PEEK or PEI are required
- Chemical exposure: PPS or PEEK have better chemical resistance
- UV outdoor exposure: PC yellows and becomes brittle; use ASA or UV-stabilized PETG
- Food contact: Not approved; use food-safe PETG or PLA
- When you need flexibility: PC is rigid; TPU or flexible TPU variants are better
- Small, intricate prints: PC’s high shrinkage makes small features prone to warping
- Filament Settings Database – Find optimal PC settings for your printer
- 3D Printer Comparison Tool – Identify printers that can handle polycarbonate
- QIDI Plus4 Review – Ideal for PC and other engineering materials
- Bambu Lab P1S Review – Enclosed CoreXY capable of PC
- Prusa CORE One Review – Heated enclosure option
- Heated Enclosures Guide – How to maintain proper ambient temperature
- ABS 3D Printing Settings Guide: Temperature, Enclosure, and Cooling for Strong Parts
- Best 3D Printer Upgrades That Actually Improve Print Quality: Complete 2026 Guide
- Best Budget 3D Printer Upgrades That Actually Improve Print Quality: Belts, Springs, Hotends & More
- 3D Printing Safety Equipment Guide: Respirators, Gloves, and Ventilation for 2026
- Creality Creality Ender 3 V3 Plus vs Creality Ender 3 Pro: Full Specs Comparison & Buyer’s Guide
The trade-offs are significant: higher printing temperatures, enclosure requirements, and more challenging bed adhesion. But for functional parts that must withstand heat, stress, and impact, PC is often the best choice within the capabilities of consumer/hobbyist printers.
Material Properties: The High-Temperature Champion
Mechanical Properties
Polycarbonate’s mechanical performance makes it one of the strongest standard FDM materials:
Compared to other engineering materials:
Thermal Properties
PC’s thermal characteristics require serious hardware:
Critical Implication: PC parts will soften and deform well below boiling water temperature. A PC bracket placed near a car engine or in a hot enclosure needs careful thermal design.
Other Properties
Moisture Sensitivity
PC is less hygroscopic than nylon but still absorbs moisture (~0.1-0.3% depending on formulation). Moisture causes:
Drying is recommended but less critical than with nylon. Store in dry conditions; dry at 80-90°C for 4-6 hours before printing if filament has been exposed to humid air.
Deep Dive: The Enclosure Imperative
Why PC Demands an Enclosure
Polycarbonate’s high glass transition temperature and crystallization behavior make it extremely sensitive to ambient temperature fluctuations. Without an enclosure, you’ll likely encounter:
2. Layer Delamination: Rapid cooling prevents proper interlayer bonding, producing weak parts that split along Z-axis.
3. Poor Surface finish: Uneven cooling creates ripples, inconsistent extrusion, and layer lines.
4. Residual Stress: Differential cooling creates internal stresses that can cause warping days after printing.
Enclosure Requirements
Minimum: Fully enclosed frame (not open-frame printer) to eliminate drafts.
Recommended:
Optimal: Dedicated heated chamber with temperature control at 70-80°C. This is what printers like the QIDI Plus4, Bambu Lab P1S (with enclosure), and Prusa CORE One provide.
Bed Adhesion Strategies
Getting the first layer to stick is half the battle with PC:
Build Surfaces (in order of preference):
2. Garolite (FR-4) — durable, heat-resistant, releases well when cool
3. Glass with Magigoo PC or PVA glue stick — good but may need reapplication
4. BuildTak — works but may degrade quickly at high temps
5. Kapton tape — traditional choice, less convenient than PEI but effective
Bed Temperature: 100-120°C (higher than most materials). Some recommend up to 130°C for first layer, then 110-120°C for remainder.
Bed Preparation:
Adhesion Auxiliaries:
Print Settings for Success
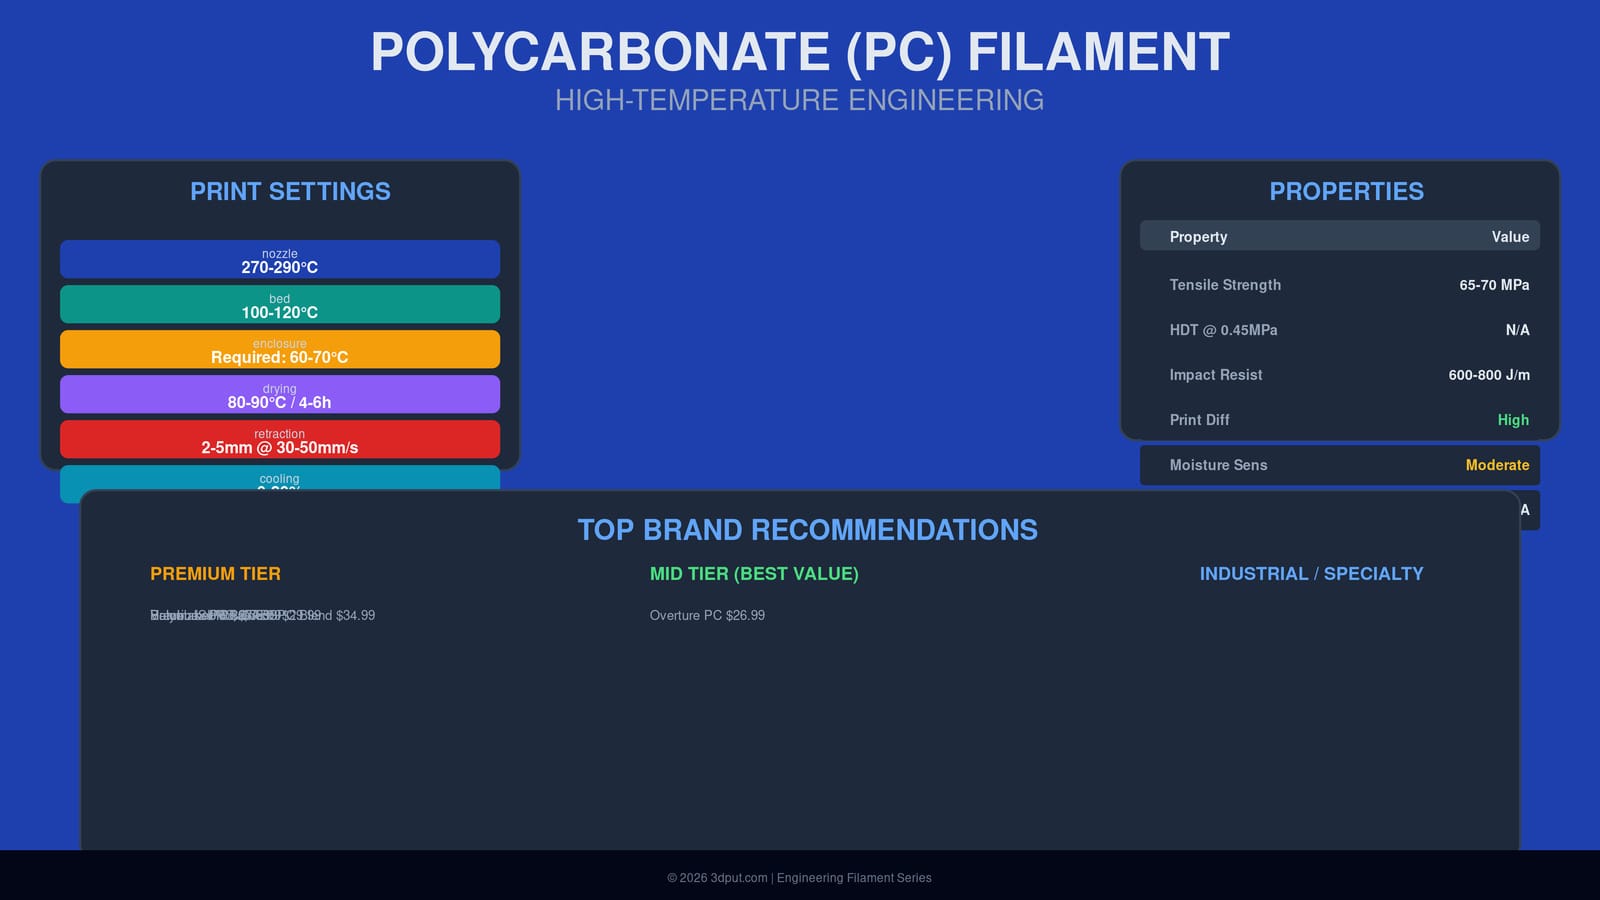
Temperature Settings
Nozzle Temperature: 260-300°C depending on specific PC blend
Bed Temperature: 100-120°C (some recommend 110-125°C)
Enclosure: Maintain ambient temperature of 60-70°C ideally
Retraction Settings
PC’s high temperature and viscous flow make retraction tricky:
Why shorter retraction? PC’s high viscosity means you don’t need much retraction to stop flow, and long retractions in hot conditions can cause partial clogs as filament softens in cold zone.
Print Speed Recommendations
PC typically prints slower than PLA/PETG due to high temps and need for layer adhesion:
Note: Speed is less critical than temperature and cooling control. You can print PC at higher speeds (80-100 mm/s) on well-tuned systems with excellent cooling management and robust hardware, but slower speeds yield better results.
Cooling
Minimal to zero cooling for most prints:
PC needs to stay hot to properly fuse layers. Only use cooling for small overhangs or bridges, and even then keep it minimal.
Layer Height and Extrusion
Advanced Settings
Drying (Important but Less Critical Than Nylon)
Hardware Requirements
Hotend:
Bed:
Frame:
Power:
Top Brand Recommendations
Polycarbonate filaments from major brands are generally modified blends optimized for printability. Here are the top recommendations as of 2026:
Premium Tier
| Brand | Product | Price/kg | Nozzle Temp | Bed Temp | Key Features |
|---|---|---|---|---|---|
| Prusa | Prusament PC Blend | $34.99 | 275-290°C | 110-120°C | Excellent printability, proprietary blend, consistent quality |
| Polymaker | Polymaker PC | $37.99 | 270-285°C | 105-120°C | Well-formulated, good bed adhesion, reliable |
| Bambu Lab | PC Filament | $36.99 | 270-290°C | 110-120°C | Optimized for Bambu enclosures, excellent surface finish |
| MatterHackers | MH Build Series PC | $39.99 | 270-285°C | 110-120°C | High-quality, good documentation |
Mid Tier (Good Value)
| Brand | Product | Price/kg | Nozzle Temp | Bed Temp | Key Features |
|---|---|---|---|---|---|
| eSUN | eSUN PC-ABS | $29.99 | 260-280°C | 100-115°C | PC-ABS blend, more forgiving than pure PC |
| Hatchbox | Hatchbox PC | $27.99 | 265-285°C | 105-120°C | Widely available, decent quality for price |
| Overture | Overture PC | $26.99 | 260-280°C | 100-115°C | Budget-friendly option with acceptable performance |
Comparison to Other Engineering Materials
| Property | PC | ABS | Nylon | PETG | PEEK |
|---|---|---|---|---|---|
| Tensile Strength | 65-70 MPa | 35-45 MPa | 40-70 MPa | 45-50 MPa | 90-100 MPa |
| HDT | 125-140°C | 85-100°C | 55-90°C | 70°C | 150-160°C |
| Impact Resistance | 600-800 J/m | 200-400 J/m | 50-100 J/m | 100-200 J/m | 50-80 J/m |
| Print Difficulty | High | Medium-High | Medium-High | Low | Very High |
| Enclosure Required | Yes | Recommended | Recommended | No | Yes (heated) |
| Nozzle Temp | 270-290°C | 220-250°C | 245-280°C | 230-250°C | 380-410°C |
PC excels in strength and temperature resistance while being more printable than PEEK. It’s the logical choice when ABS and PETG are insufficient but PEEK is overkill or impractical.
Troubleshooting Polycarbonate Prints
Problem: Warping and Corner Lifting
Symptoms: Corners lift from bed, part detaches mid-print, severe elephant’s foot.
Solutions:
Problem: Layer Separation / Delamination
Symptoms: Prints split along layer lines, parts fall apart with light pressure, visible gaps between layers.
Solutions:
Problem: Stringing and Oozing
Symptoms: Thin hairs between travel moves, blobs on print surface, fine whiskers.
Solutions:
Problem: Nozzle Clogs
Symptoms: Extruder skipping, inconsistent flow, complete blockage.
Solutions:
Problem: Poor Bed Adhesion Despite High Temp
Symptoms: First layer seems fine but part detaches after a few layers.
Solutions:
Ideal Use Cases and Applications
Polycarbonate’s combination of high strength, temperature resistance, and impact resistance makes it suitable for demanding applications:
Functional Prototypes
When to choose PC over PLA/PETG: When the prototype will be tested under load, near heat sources, or needs to survive multiple iterations of functional testing.
End-Use Parts
Caution: PC is not FDA-compliant for food contact, and prolonged UV exposure degrades it. For outdoor use, UV-resistant ASA may be better.
Engineering Applications
When NOT to Use Polycarbonate
FAQs
Q: Can I print polycarbonate without an enclosure?
A: Technically yes, but success rate drops dramatically for anything beyond small test prints (<3cm). For reliable results with functional parts, an enclosure is strongly recommended. Some users have success with draft shields and heated enclosures, but a fully enclosed environment is ideal.
Q: What’s the difference between PC and PC-ABS?
A: PC-ABS is a blend that combines polycarbonate’s strength and heat resistance with ABS’s easier printability. PC-ABS will warp less and be easier to get first-layer adhesion than pure PC, but at the cost of slightly lower HDT and tensile strength. Most consumer PC filaments are actually PC-ABS or PC-modified blends.
Q: Is polycarbonate safe to print?
A: PC emits some fumes during printing (though less than ABS). Print in a well-ventilated area or with exhaust. Some users recommend respirators for prolonged printing sessions. The fumes aren’t as toxic as ABS but are still not ideal to breathe. Use enclosures with proper ventilation if printing regularly.
Q: Can I smooth PC prints like ABS with acetone vapor?
A: No. PC is not soluble in acetone. PC parts can be smoothed with sanding, chemical polishing with specific PC solvents (dangerous), or by adjusting print settings for better surface finish. Some users report success with ethyl acetate vapor for very light smoothing, but it’s not a standard technique like ABS vapor smoothing.
Q: How does PC compare to ABS in strength?
A: PC is about 50-70% stronger in tensile strength and has 2-3x better impact resistance. PC also has a higher heat deflection temperature (~130°C vs ~100°C for ABS). ABS is easier to print and cheaper, but PC is objectively superior in mechanical properties.
Q: Do I need a hardened steel nozzle for PC?
A: Not for standard PC or PC-ABS blends; brass is acceptable but will wear faster than with PLA/PETG. However, filled PC variants (carbon fiber reinforced) absolutely require hardened steel or ruby nozzles due to abrasiveness.
Q: What temperature should my enclosure be?
A: Target 60-70°C for optimal PC printing. This can be achieved passively from bed heat alone for small enclosures, but larger volumes may need active heating. Don’t exceed 80°C to avoid damaging electronics or causing excessively long cooling times.
Q: Can PC parts be machined after printing?
A: Yes, PC machines well with standard metalworking tools. CNC milling, drilling, and tapping are possible. Use sharp tools and moderate feed rates. PC can be sanded with wet/dry sandpaper for smoothing. Can be glued with epoxy or super glue (CA); solvent welding with methylene chloride works but is advanced.
Conclusion
Polycarbonate represents the top tier of engineering materials available to consumer FDM 3D printing. With exceptional strength, high temperature resistance, and outstanding impact toughness, PC parts can handle applications where PLA, PETG, and even ABS would fail. However, these advantages come with a cost: PC demands serious hardware—an all-metal hotend, a heated bed capable of 120°C+, and ideally a fully enclosed, temperature-controlled print chamber.
Successful PC printing requires disciplined attention to temperature, enclosure management, and bed adhesion. But for engineers, makers, and professionals who need parts that actually function under real-world conditions, polycarbonate is worth the extra effort. Brands like Prusa, Polymaker, and Bambu Lab have developed proprietary blends that make PC much more approachable than pure polycarbonate was in the past, opening up this high-performance material to a wider audience.
If you haven’t yet explored polycarbonate, and your printer can handle the requirements, it’s worth experimenting. The difference in part strength and temperature resistance compared to “regular” filaments is substantial. Just respect the enclosure requirement and dry your filament—your future functional prototypes will thank you.
—
Related Resources on 3dput.com:
Frequently Asked Questions
What is the best 3D printing filament for beginners?
PLA is the best starting filament — it prints easily at 190-220°C without an enclosure and produces good results. Once comfortable, PETG offers better strength and temperature resistance for functional parts.
How do I choose the right filament?
Consider the application: PLA for display models, PETG for functional parts, ABS/ASA for heat/sunlight exposure, TPU for flexible parts, and specialty filaments for engineering applications. Each has specific printer requirements.
What temperature should I print different filaments at?
PLA: 190-220°C nozzle / 50-60°C bed. PETG: 220-250°C / 70-80°C. ABS: 230-260°C / 100-110°C (enclosure needed). Nylon: 240-270°C / 70-90°C. Always check manufacturer recommendations for specific brands.
📌 Related Articles