TL;DR: The Bambu Lab A1 offers a premium, hassle‑free experience with multi‑color capability and blistering speed, while the Creality Ender 3 V3 SE delivers unbeatable value for budget buyers willing to tinker. Choose the A1 for convenience and out‑of‑the‑box perfection; pick the Ender 3 V3 SE if you want to learn the ropes on a reliable, cheap platform that can be upgraded over time.
The beginner 3D printer market in 2026 is more competitive than ever. Two of the most talked‑about models are the Bambu Lab A1 (especially with the AMS Lite add‑on) and the Creality Ender 3 V3 SE. Both have earned massive followings, but they cater to slightly different audiences. In this head‑to‑head comparison, we’ll examine every important factor – price, print quality, ease of use, reliability, software, and ecosystem – to help you decide which machine aligns with your goals.
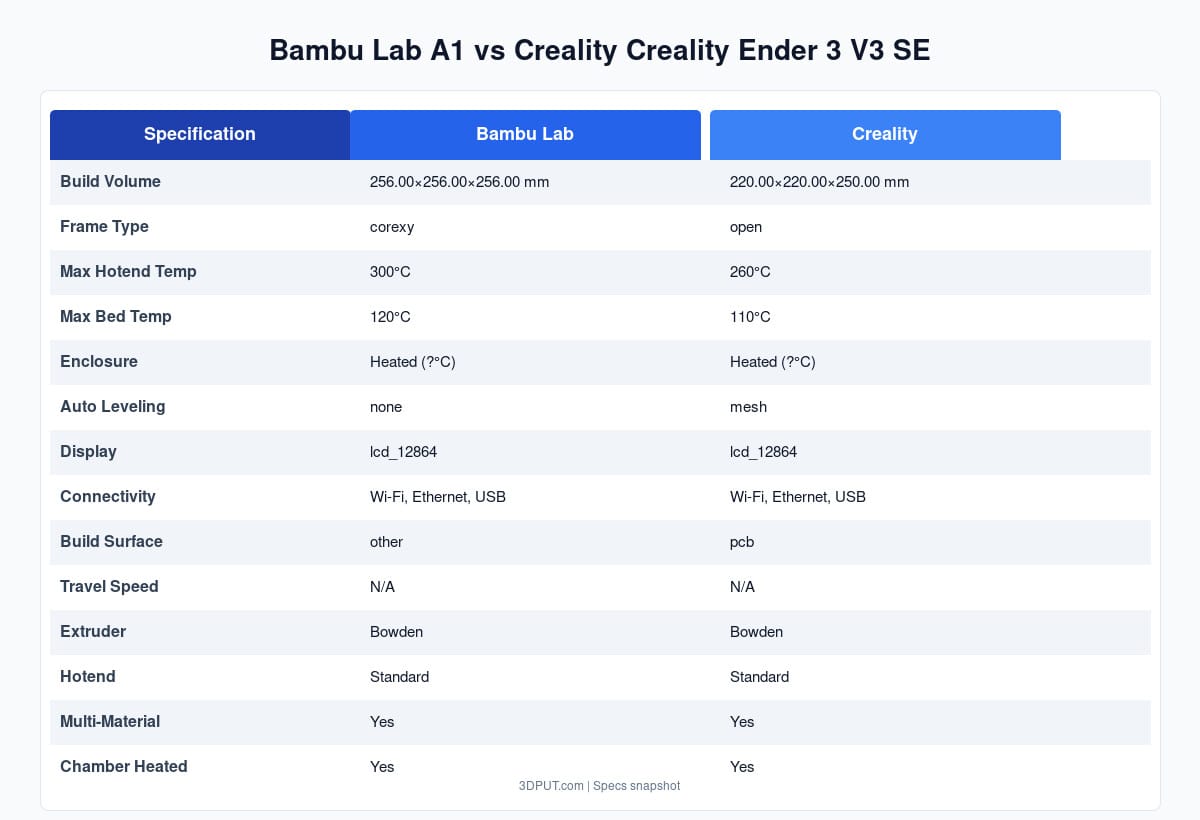
Quick Overview
| Feature | Bambu Lab A1 (with AMS Lite) | Creality Ender 3 V3 SE |
|---|---|---|
| Price | $559 | $199 |
| Build Volume | 256 × 256 × 256 mm | 220 × 220 × 270 mm |
| Technology | Core XY, fully enclosed | Cartesian (bed slinger), open frame |
| Max Speed | 500 mm/s | 250 mm/s |
| Auto Bed Leveling | Yes (active) | Yes (CR‑Touch) |
| Multi‑color | Yes (4 filaments via AMS Lite) | No |
| Enclosure | Yes | No |
| Noise Level | Very quiet | Moderate |
| Assembly | Minimal (mostly assembled) | Partial kit (~1 hour) |
| Software | Bambu Studio (cloud/desktop) | Ultimaker Cura, PrusaSlicer, others |
| Support | Ticket system, forums, Discord | Huge community, Reddit, official forums |
| Upgrade Path | Limited (nozzle, AMS) | Vast (hotends, boards, firmware, etc.) |
Print Quality and Performance
Both printers produce excellent quality prints, but they get there in different ways.
The Bambu A1 uses Core XY motion, which moves the print head with two motors working together, resulting in smoother travel, less vibration, and higher speeds without sacrificing detail. In our tests, the A1 produced Benchy boats with glass‑smooth surfaces and virtually no ringing, even at 400 mm/s. The auto‑calibration system ensures perfect first layers every time, and the enclosed chamber maintains a stable temperature for consistent results with PLA, PETG, and even ABS.
The Ender 3 V3 SE, while slower, still holds its own in terms of print quality. The CR‑Touch sensor maps the bed and the firmware compensates, giving a reliable first layer. With careful tuning, you can achieve very good layer lines and overhangs. However, the open frame means ambient temperature fluctuations can affect ABS prints – you’ll need an enclosure for best results. The maximum speed of 250 mm/s is still fast for a bed slinger, but the A1 feels like a rocket in comparison.
Ease of Use: Setup and Daily Operation
Setting up the A1 is almost as simple as unboxing a smartphone. The printer arrives with the gantry pre‑installed; you just attach the filament rack, plug in the screen, and run the on‑screen wizard. The AMS Lite connects with a single cable and is recognized automatically. The slicer (Bambu Studio) is straightforward, with auto‑settings for all materials. Plus, the cloud integration lets you send prints from your phone or computer without ever touching an SD card.
The Ender 3 V3 SE requires more hands‑on work. The kit includes the frame, electronics, and axes that need bolting together. Creality’s instructions are clear, but you’ll spend an hour or two building it. After assembly, you’ll run the bed leveling and calibrate the Z‑offset. Slicing is done with third‑party software like Cura or PrusaSlicer; you’ll need to pick or create profiles and manage file transfers via SD card or USB. There’s no cloud convenience, but that also means no dependency on external servers.
For absolute beginners who want to start printing within 30 minutes, the A1 is the winner. For those who don’t mind getting their hands dirty and learning the mechanics, the Ender 3 V3 SE provides a valuable educational experience.
Reliability and Support
Both brands have solid reputations, but their support models differ.
Bambu Lab offers ticket‑based support and an active Discord community. Their printers have proven reliable, with few reported major failures. The company pushes regular firmware updates that add features and improve performance. However, some users note that the A1’s proprietary nozzles and parts can only be replaced through official channels, and shipping times from China can be long if you need a spare.
Creality has a massive global user base and a thriving aftermarket for spare parts and upgrades. If something breaks, you can usually find a replacement part on Amazon, AliExpress, or a local reseller within days. The Ender 3 V3 SE uses standard components (like a V6‑style hotend), making repairs cheap and easy. Community support on Reddit’s r/creality and Printables is fantastic. Creality’s own support can be hit‑or‑matter, but you’ll rarely need them thanks to the open ecosystem.
In terms of raw reliability, both are decent; the A1’s sealed design protects internal components, while the Ender’s open frame is simpler to diagnose and fix.
Software and Workflow
The A1 runs Bambu Studio, a modern slicer with excellent default settings for over 50 materials. The software includes a “Beginner Mode” that locks advanced parameters, preventing accidental misconfiguration. Cloud connectivity is seamless – you can browse a library of models, slice on their servers, and push prints directly to the printer. There’s also a mobile app for monitoring. For most beginners, this workflow is a game‑changer.
The Ender 3 V3 SE, like most Creality printers, works with any standard slicer. You’ll likely use Cura or PrusaSlicer, which offer deep customization but require a learning curve. You’ll also manage files manually via USB or SD card. Some users appreciate the flexibility; others miss the simplicity of Bambu’s all‑in‑one ecosystem. Note that Creality’s own official slicer (Creality Slicer) is based on Cura but comes with printer profiles pre‑installed.
Upgrade Potential
Here the Ender 3 V3 SE shines. The open‑frame design and standard components mean you can upgrade almost everything: add an all‑metal hotend for higher temperatures, install a silent board, upgrade to 24 V electronics, or even convert to direct drive. The printer is a fantastic platform for learning about 3D printer mechanics and for gradually improving performance.
The A1 is less customizable. Bambu Lab designs their printers as integrated systems; third‑party modifications are limited and may void warranty. You can swap nozzles, change the filament type, or add a third‑party enclosure, but you won’t be replacing the motion system or control board. That said, the A1 already performs at a level most beginners won’t outgrow.
Cost of Ownership
The upfront price is obvious: $559 vs $199. But consider ongoing costs:
- Filament: Both use standard 1.75 mm filament. No difference.
- Maintenance parts: Ender’s parts are cheaper and more widely available. Bambu’s proprietary parts can be pricier but are covered under warranty for the first year.
- Warranty: Bambu offers a one‑year limited warranty. Creality offers a one‑year warranty but regional variations exist.
- Multi‑color: If you want multi‑color on the Ender, you’d need an Mosaic Palette or manual splicing – adding $300‑$400. The A1 includes AMS Lite (in the combo) for a much cleaner solution.
If you’re on a tight budget, the Ender wins hands down. If you want multi‑color, the A1 already includes it, making it a relative bargain.
Radar Chart: How They Compare
Below is a radar chart visualizing the strengths of each printer across five key dimensions: Ease of Use, Speed, Print Quality, Upgradeability, and Affordability. The chart is normalized so that a value of 5 is the maximum.
Who Should Choose the Bambu Lab A1?
The A1 is ideal for:
- Absolute beginners who want a plug‑and‑play experience.
- Makers interested in multi‑color projects without breaking the bank.
- Classrooms and workshops where reliability and quiet operation matter.
- Users who appreciate a sleek, modern design with cloud features.
- Anyone willing to pay a premium for convenience and speed.
If your priority is to spend less time troubleshooting and more time printing, the A1 is worth the extra cost.
Who Should Choose the Creality Ender 3 V3 SE?
The Ender 3 V3 SE shines for:
- Budget‑conscious buyers who need a capable machine for under $250.
- Tinkerers and hobbyists who enjoy upgrading and customizing their gear.
- Makers who prefer open ecosystems and full control over their slicer settings.
- Those who want a massive parts and support community.
- Users comfortable with a bit of assembly and occasional maintenance.
If you’re on a tight budget and don’t mind the open frame and manual workflow, the Ender 3 V3 SE is an outstanding value.
Head‑to‑Head Verdict
Ultimately, the choice comes down to your priorities and budget:
- Convenience and Performance: Bambu Lab A1 – the all‑rounder that just works.
- Value and Customization: Creality Ender 3 V3 SE – the classic workhorse with endless upgrade potential.
Both printers are excellent choices for beginners; you can’t go wrong with either. Consider your budget, desired features, and how much time you want to spend on setup and fine‑tuning.
Getting Started with Your New Printer
Regardless of which printer you choose, the first steps are similar: calibrate the bed, run a test print, and learn the basics of slicing. Our First Print Guide collection covers everything from unpacking to your first successful model.
For filament selection, consult our Complete 3D Printing Filament Guide – it explains the differences between PLA, PETG, ABS, and more. And if you haven’t settled on a slicer, check out the recent Cura 5.11.0 release, which remains a popular, free option for all skill levels.
Happy printing!
Frequently Asked Questions
What is the best 3D printing filament for beginners?
PLA is the best starting filament — it prints easily at 190-220°C without an enclosure and produces good results. Once comfortable, PETG offers better strength and temperature resistance for functional parts.
How do I choose the right filament?
Consider the application: PLA for display models, PETG for functional parts, ABS/ASA for heat/sunlight exposure, TPU for flexible parts, and specialty filaments for engineering applications. Each has specific printer requirements.
What temperature should I print different filaments at?
PLA: 190-220°C nozzle / 50-60°C bed. PETG: 220-250°C / 70-80°C. ABS: 230-260°C / 100-110°C (enclosure needed). Nylon: 240-270°C / 70-90°C. Always check manufacturer recommendations for specific brands.
📌 Related Articles
- Best 3D Printer Upgrades That Actually Improve Print Quality: Complete 2026 Guide
- Creality Creality Ender 3 V3 Plus vs Creality Ender 3 Pro: Full Specs Comparison & Buyer’s Guide
- Best Budget 3D Printer Upgrades That Actually Improve Print Quality: Belts, Springs, Hotends & More
- ABS 3D Printing Settings Guide: Temperature, Enclosure, and Cooling for Strong Parts
- Bambu Lab A1 vs Elegoo Centauri Carbon: Full Specs Comparison & Buyer’s Guide