
Introduction
So you’ve unboxed your first 3D printer, leveled the bed, and loaded a spool of PLA. That first print can be nerve-wracking. Will it warp, string, or simply fail to stick? Don’t worry. PLA (Polylactic Acid) is the most beginner-friendly filament available, and with the right settings and techniques, you can produce beautiful, reliable prints from day one. This guide walks you through everything you need to know, from slicer configuration to bed adhesion, common problem-solving, and best practices that will make your first PLA prints a resounding success.
What is PLA?
PLA is a biodegradable thermoplastic derived from renewable resources like corn starch or sugarcane. It’s the go-to filament for beginners because it prints at relatively low temperatures, has minimal warping, and produces little odor. Unlike ABS, it doesn’t require a heated bed (though one helps), and it’s forgiving of minor calibration issues. However, PLA has limitations: it’s less heat-resistant than PETG or ABS, can be brittle, and may degrade under prolonged sunlight. For decorative items, prototypes, and learning the ropes, PLA is perfect.
Why Choose PLA for Your First Print?
Before diving into settings, let’s put PLA into perspective compared to other common filaments. The table below highlights PLA’s strengths and weaknesses relative to PETG and ABS—two other popular options beginners often consider.
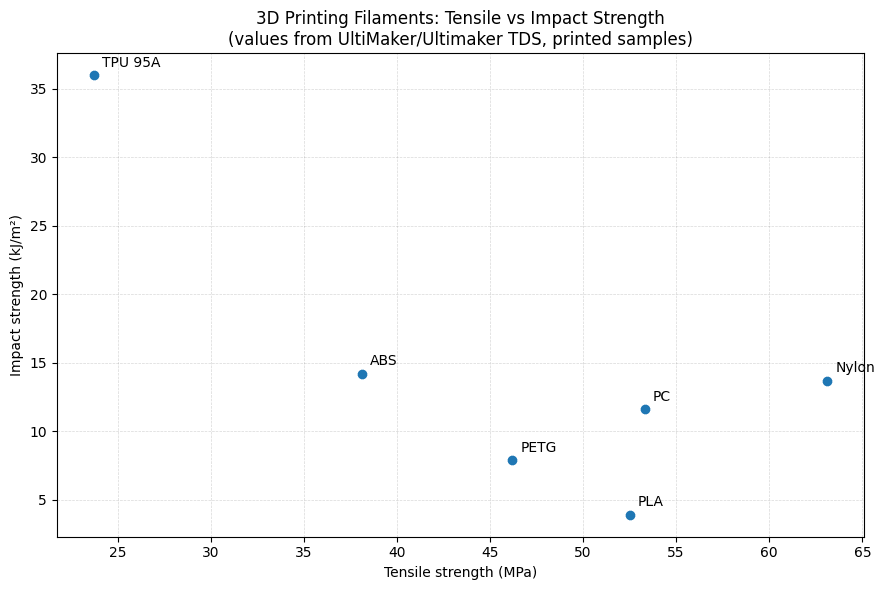
As the diagram shows, PLA excels in ease of use, minimal warping, and low printing temperatures. That makes it the ideal starting point. Once you’ve mastered PLA, transitioning to PETG or ABS will be much easier.
Preparing Your Printer for PLA
Good prints start with a well-prepared printer. Before you even slice, make sure:
- Bed is clean: Use isopropyl alcohol to remove grease and dust. A clean surface is critical for adhesion.
- Bed is level: Follow your printer’s leveling procedure. The first layer should be slightly squished everywhere.
- Nozzle is clear: Ensure there’s no residual filament from previous materials. A cold pull (if needed) can help.
- Filament is dry: PLA is less hygroscopic than Nylon, but old, wet filament can cause bubbles and poor layer bonding. If your filament has been exposed to air, consider drying it at 50°C for 4-6 hours.
Optimal Slicer Settings for PLA
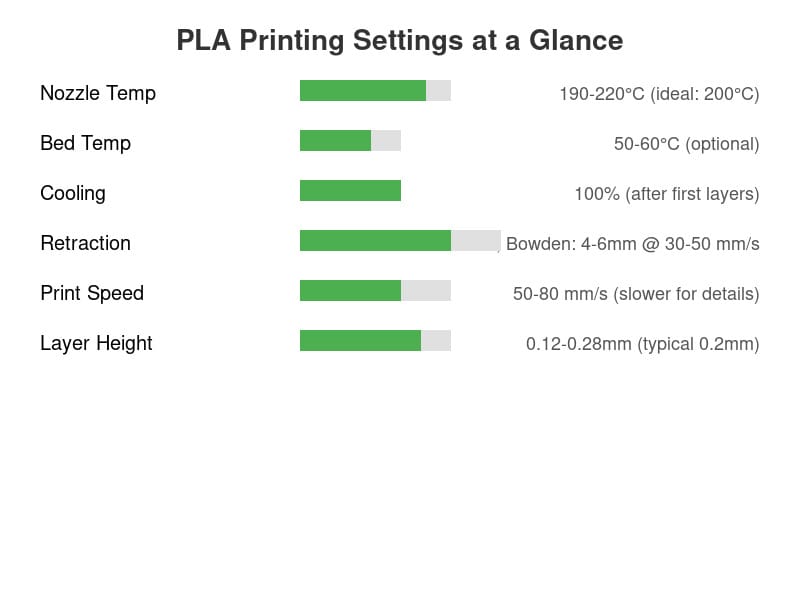
Every printer and filament brand varies slightly, but these are proven starting points for most 1.75mm PLA:
Key parameters explained:
- Nozzle temperature: Start at 200°C. See also: Best 3D Printer Upgrades That Actually Improve Pri…. If prints look stringy or rough, try 195°C; if layers separate, bump to 205-210°C.
- Bed temperature: 50-60°C is common. Some printers can print PLA on an unheated bed with blue painter’s tape or glue stick. A warm bed improves first-layer adhesion and reduces warping on larger prints.
- Cooling fan: Set to 100% after the first 1-2 layers. PLA benefits from rapid cooling to solidify quickly and maintain crisp details. If bridging is poor, ensure cooling is on.
- Retraction: Essential to prevent stringing. Direct-drive extruders: 0.8-1.2mm at 30-50 mm/s. Bowden: 4-6mm at 40-50 mm/s. Tune using a retraction test print.
- Print speed: 50-80 mm/s is safe. Slower speeds (30-40 mm/s) yield higher quality on fine details; faster speeds (up to 100 mm/s) are possible on well-tuned machines.
- Layer height: 0.2mm is a good default. For higher resolution, try 0.12mm; for faster rough prints, 0.28mm works.
- Infill: 15-20% for functional prints; 10% for non-critical; 20-25% for strength. Use gyroid or cubic infill for isotropic strength.
Bed Adhesion Techniques
Even with perfect settings, the first layer can fail if the bed isn’t prepared. Here’s how to ensure that the crucial first layer sticks:
- Clean, level bed: As mentioned, this is the foundation.
- Use adhesives: A thin layer of glue stick (PVA glue) or hairspray can dramatically improve adhesion, especially on glass or metal beds.
- Brim or raft: For parts with a small contact area, add a brim (5-10mm) to increase grip. Rafts are thicker but consume more material and time.
- Enclosure: Not necessary for PLA, but if your room is drafty, an enclosure helps maintain a stable temperature and prevents warping on large prints.
- First-layer squish: The filament should be slightly flattened against the bed. If the first layer doesn’t stick, lower the nozzle by ~0.05mm; if it’s too squished and hard to pull off, raise it slightly.
Common Problems and Solutions
Even the best preparation sometimes encounters issues. Here’s a troubleshooting checklist:
Warping
Edges lift off the bed. Fixes: Increase bed temperature (up to 60°C), ensure bed is clean and level, use a brim, apply adhesive, check first-layer squish, and eliminate drafts.
Stringing (Oozing)
Thin hairs between travel moves. Fixes: Increase retraction distance and speed, enable “wipe” in your slicer, reduce nozzle temperature slightly, and ensure filament is dry.
Layer Separation / Weak Interlayer Bonding
Layers don’t stick together, causing splits. Fixes: Increase nozzle temperature (by 5-10°C), decrease print speed, decrease cooling fan (for first few layers), and verify filament is dry.
Under-extrusion
Prints look thin, gaps appear. Fixes: Check for partial nozzle clog, verify filament diameter matches slicer setting, calibrate extrusion multiplier (flow), and ensure gear is gripping filament securely.
Over-extrusion
Excess plastic, blobs, and dimensional inaccuracy. Fixes: Calibrate extrusion steps/mm, lower flow rate in slicer, ensure nozzle diameter matches settings.
Poor Bridging
Bridged sagging. See also: ABS 3D Printing Settings Guide: Temperature, Enclo…. Fixes: Enable cooling fan, reduce bridge speed, use support material or design self-supporting angles.
Post-Processing PLA Prints
PLA is easy to finish:
- Removing supports: Usually snaps off cleanly. Use needle-nose pliers for tight spots.
- Sanding: Start with coarse (120 grit) to remove layer lines, finish with fine (400+ grit) for smoothness. Wet sanding reduces dust.
- Filling and painting: Apply a coat of primer (spray or brush) for better paint adhesion. Acrylic paints work well.
- Gluing: Use super glue (cyanoacrylate) or epoxy for assembling parts. Solvent welding (with dichloromethane) works for fusing PLA but requires ventilation.
Maintenance and Storage
To keep your filament and printer in top shape:
- Storage: Store PLA in an airtight container with desicant. While PLA absorbs less moisture than Nylon, prolonged humidity can still cause bubbling and poor extrusion.
- Nozzle care: Clean the nozzle regularly. When changing filaments, heat to printing temperature and pull out the old filament with a quick, firm tug to clear debris.
- Keep notes: Maintain a simple log of settings that work for each filament brand/color. It speeds up future prints.
Best Practices for Success
Here are the golden rules that will make you a better printer:
- Print calibration models: Start with a bed level test, then a temperature tower, retraction test, and calibration cube. These diagnose issues before you waste time on a real project.
- Join the community: Subreddits like r/3Dprinting, forums like the Prusa community, and Discord servers are treasure troves of advice. Don’t hesitate to ask questions.
- Start simple: Your first few prints should be small, forgiving models. Avoid large flat surfaces or tiny details until you’re comfortable.
- Be patient: 3D printing is as much an art as a science. Troubleshooting is part of the learning curve. Every failure teaches you something.
Conclusion
Your first PLA print is the beginning of an immensely rewarding hobby. By following the settings and techniques in this guide, you’ll avoid the common pitfalls that frustrate newcomers. Remember: perfecting your craft takes time. Experiment, take notes, and enjoy the process. When you’re ready to explore other filaments, you’ll have a solid foundation. Happy printing!
For more beginner content, explore our Beginner Printers and First Print Guide categories. You can also learn about different filament materials in our Materials & Filaments section.
Frequently Asked Questions
What is the best 3D printing filament for beginners?
PLA is the best starting filament — it prints easily at 190-220°C without an enclosure and produces good results. Once comfortable, PETG offers better strength and temperature resistance for functional parts.
How do I choose the right filament?
Consider the application: PLA for display models, PETG for functional parts, ABS/ASA for heat/sunlight exposure, TPU for flexible parts, and specialty filaments for engineering applications. Each has specific printer requirements.
What temperature should I print different filaments at?
PLA: 190-220°C nozzle / 50-60°C bed. PETG: 220-250°C / 70-80°C. ABS: 230-260°C / 100-110°C (enclosure needed). Nylon: 240-270°C / 70-90°C. Always check manufacturer recommendations for specific brands.
📌 Related Articles
- Best 3D Printer Upgrades That Actually Improve Print Quality: Complete 2026 Guide
- ABS 3D Printing Settings Guide: Temperature, Enclosure, and Cooling for Strong Parts
- Best Budget 3D Printer Upgrades That Actually Improve Print Quality: Belts, Springs, Hotends & More
- The Current State of Metal 3D Printing in 2020
- Prusa Research Mini+ vs Prusa MK4: Full Specs Comparison & Buyer’s Guide