
Quick Answer Box: 3D scanning and 3D printing can create custom neck orthoses (cervical collars) in just 72 hours compared to 6 weeks for traditional methods. The process costs approximately £325 (vs £350 traditional) and offers superior comfort, better ventilation through porous designs, and the ability to iterate designs quickly based on patient feedback. This digital workflow is particularly beneficial for patients with atypical anatomy or complex clinical needs who haven’t found relief with standard commercial collars.
Traditional vs 3D Printed Orthosis Workflow Comparison
| Aspect | Traditional Manufacturing | 3D Scanning & Printing Workflow |
|---|---|---|
| Production Time | 6 weeks (multiple appointments) | 72 hours (3 days) |
| Cost | ~£350 | ~£325 |
| Customization Level | Limited to standard sizes/shapes | Fully bespoke to patient anatomy |
| Design Iterations | Difficult and time-consuming | Quick and automated |
| Patient Appointments | 4-5 separate visits | Potential single visit |
| Ventilation | Varies by design | Porous pattern for better airflow |
| Weight | Heavier (solid materials) | Lighter (porous design) |
Custom orthotics made through conventional manufacturing methods require casting, sculpting, molding, and fitting to be completed before they’re ready for the patient to wear. It can take up to six weeks before the orthosis is complete. But using 3D printing can improve not only the aesthetic, functional, and mechanical properties of the orthotic, but also drastically cut back the time and costs.
Researchers Luke Hale, Emma Linley, and Deepak M. Kalaskar from the NHS Royal National Orthopaedic Hospital in the UK published “A digital workflow for design and fabrication of bespoke orthoses using 3D scanning and 3D printing, a patient-based case study,” about their novel workflow for using 3D scanning and printing to design and build custom orthoses. Then, they applied their workflow to “a clinically relevant translational case study in a patient with a neurological disorder and complex clinical needs.”
3D printed orthotic devices can be fabricated with biomechanical properties that are comparable to manually built ones, and CAD makes it easy to adjust the model to meet patient needs. Additionally, 3D scanning has proven very helpful in the healthcare field, thanks to its rapid creation of accurate body geometry.

Cervical collar (Image: Healthline)
This study focuses on a cervical collar orthosis, which are used for three specific functions:
- Stabilize or immobilize the neck after surgery or trauma
- Support the neck in cases of chronic neck pain
- Hold the head up in cases of neuromuscular weakness
Wearing these collars for long periods of time can be restrictive and uncomfortable, but configurable, custom devices have been created for patients suffering from progressive neuromuscular neck weakness. However, they still might not be well-suited for those with atypical anatomy or uncommon clinical needs, which is why bespoke collars are often the only thing that can help.
“This study demonstrates the development and application of a novel workflow for creating cervical orthoses, using a combination of 3D scanning, biomimetic design and additive manufacturing,” the researchers wrote.
The patient in this case was diagnosed at age 55 with transverse myelitis, an inflammation of the spinal cord that can cause neurological defects like sensory loss and weakness. She could walk, but required assistance for all other activities, because the acute weakness in her neck muscles meant that she couldn’t hold her neck upright. She needed upper limb orthoses for pain relief and stability, but couldn’t wear a cervical collar because of “a sense of restricted breathing.” Over the next few years, her cervical posture got worse, which caused her even more pain, reduced her field of vision, and affected her respiratory function.
“All traditional and commercial approaches to helping the patient’s cervical instability and resulting ‘head-drop’ had previously failed, with associated progressive deterioration in the patient’s clinical state and posture,” the researchers explained. “The workflow was developed to design and fabricate a bespoke device for this patient with no viable alternative therapy.”
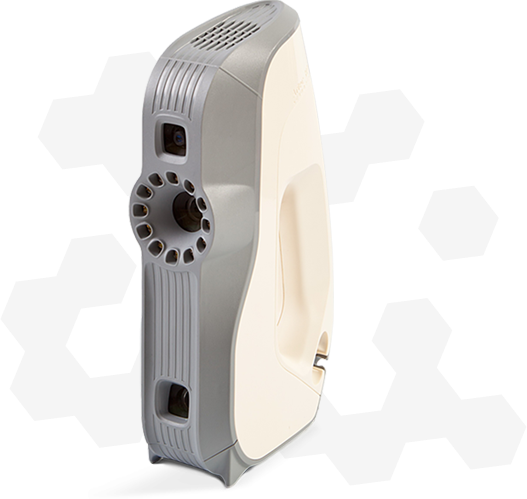
Artec EVA
They turned to biomimetics, which replicates natural systems to solve human problems, to design the digital workflow for a custom designed orthosis. They scanned the patient’s head, held in a corrected position, with a handheld Artec EVA 3D scanner, and Artec Studio 12 software processed the scan data, which was “validated against actual measurements to ensure accuracy.” They used Houdini software to develop the design process and workflow.
“The 3D scan mesh is imported into the Houdini software, and the user positions simple guide geometry, a cylinder, over the 3D scan. This geometry is projected onto the 3D scan mesh (Fig. 1a),” they explain. “The projection process uses the point normals of the guide geometry to create ‘rays’ that extend in the direction of the normal. These normals are then reversed, to point inwards towards the 3D scan geometry. If a given ‘ray’ collides with the 3D scan mesh, that point is moved to the collision point on the 3D scan.”
A mesh was created that conforms to the 3D scan, with easily modified geometry, and a comfortable orthosis was formed by using an algorithm to relax the geometry. The paper provides a more in-depth explanation of how the researchers optimized the design, including using the mesh in a finite element analysis (FEA) solver and generating a porous pattern for better ventilation and reduced weight and cost of the final orthosis.
Four prototypes were 3D printed on a Stratasys Fortus 380mc system. For comfort, padding was added to the internal surfaces of the printed orthoses, and the collar geometry was used “as input for a variational surface cutting algorithm.” The resulting flat sections acted as templates to cut the padding.
The first prototype, which validated the 3D scanning to printing workflow, was hinged on one side and printed out of semi-flexible Nylon 12, but was deemed too close-fitting. While the next three were similar in that they were two-part designs printed out of UV-stable ASA (deemed the most appropriate material), they had different modifications.
“With each design, patient comfort and usability was improved by making small changes to adopt design considerations and to correct cervical posture and improve patient compliance,” the researchers wrote.
Prototype Iteration Comparison
| Prototype | Material | Design Features | Key Improvements | Patient Feedback |
|---|---|---|---|---|
| Prototype 1 | Nylon 12 (semi-flexible) | Single-piece, hinged on one side | Validated workflow | Too close-fitting |
| Prototype 2 | UV-stable ASA | Two-part design with side straps | Prevented skin pressure at edges, increased skin-to-orthosis clearance for padding | Improved comfort, better breathing |
| Prototype 3 | UV-stable ASA | Two-part design | Material removed at shoulders/head, corrective adjustment for lateral/axial rotation with padding | Better posture, reduced pain |
| Prototype 4 (Final) | UV-stable ASA | Two-part design with all previous improvements | Incorporated all improvements from prototypes 2 & 3 | Tolerated for 4 hours, progressive comfort increase |
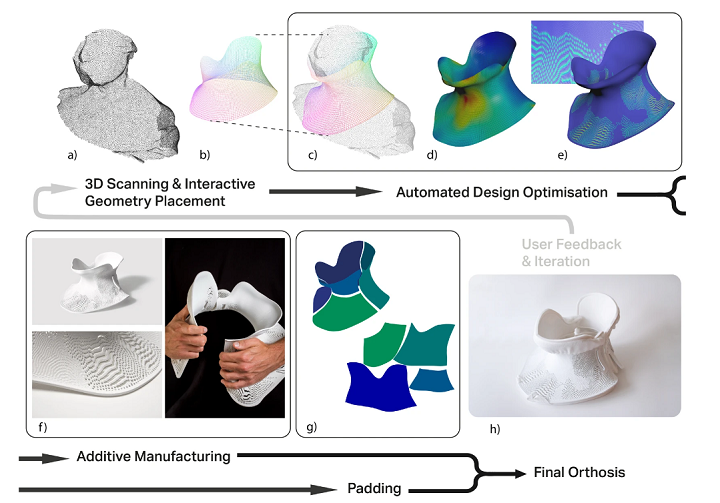
Fig. 1: Schematic of design workflow and fabrication of custom orthosis. (a) 3D scan of patient is acquired; (b) simple geometry positioned over region of interest, with feedback on how geometry placement relates to the 3D scan; (c) geometry is fitted, then relaxed away from the scan surface to improve patient comfort; (d) deformation energy mapped to the surface (red = highest; blue = lowest); (e) deformation energy used to generate a porous pattern, which is extruded to form 3D printable geometry. Steps (c-e) are automated and require no user input. (f) The orthosis is 3D printed. (g) A variational surface cutting algorithm is used on the geometry from (c) to create a template for cutting orthosis padding. (h) Assembly of 3D printed component and padding results in final cervical orthosis. The workflow can be repeated and iterated based on feedback. Photos: David Bishop and Matthew Town.
The second prototype prevented skin pressure at the edges of the collar, increased the clearance between the skin and the orthotic surface to accommodate more padding, and featured side straps. The third “involved the manual removal of material away from the second prototype, at the shoulders and head, and a corrective adjustment to the patient’s tendency of lateral and axial rotation of the head with padding,” and the final prototype incorporated all the previous improvements.
“Total time from scanning to delivery of 3D printed orthosis was approximately 72 hrs (3 days),” they wrote. “The time taken for supplying traditional orthoses typically involves separate patient appointments for initial assessment, measurement, evaluation, adjustment and final supply of the device, with each appointment lasting around 40 minutes in a complex case2. Manufacturing is performed by a skilled technician in between these appointments. For a typical orthosis, this results in a turnaround time of around 6 weeks in our hospital.”
An occupational therapist fitted the collar, and after wearing it at home and out in the world regularly, the patient evaluated her new 3D printed cervical collar using a modified questionnaire, just like she had for the previous prototypes.
“There was a progressive improvement in subjective feedback through each iteration as represented by the site of discomfort and comfort score shown in Fig. 2a,b; the collar could be tolerated for progressively longer with greater levels of comfort. There was a marked improvement in posture whilst wearing the collar, with reduction of the compensatory exaggerated lordosis at the lumbar spine (Fig. 2c),” the team reported.
The patient had reduced pain levels, an easier ability to swallow, and a wider field of vision thanks to the neutral head position. The padding also greatly increased her comfort levels in wearing the collar, and she could tolerate the final prototype for four hours, “with gradual increase in usage time.”

Fig. 2: (a) Red area shows reported sites of discomfort, at maximum duration with different collars. (0 = no reported discomfort, 5 = severe discomfort); (b) patient self-reported comfort over time with continuous use, over different iterations; (c) Patient wearing 4th prototyp;, comparison of posture and spine position pre- and post-application of orthosis shows spine position with and without collar, with improvement of head position, significant reduction of cervical kyphosis, and reduction in pronounced, compensatory lordosis at the lumbar spine.
“The workflow was therefore validated in producing clinically-beneficial bespoke orthoses whilst also facilitating iteration, modification and improvement of the design,” they wrote.
“Streamlining this process, with a dedicated 3D printer, could result in a point-of-care 3D printing process, with patient attending hospital, having 3D scan and leaving with orthosis the following day.”
The total cost of the 3D printed collar was £325, in comparison to an estimated £350 for a conventionally manufactured one. So the cost savings aren’t great, but the study did show that combining 3D scanning and 3D printing can help achieve a bespoke cervical collar.
“In future work, the proposed workflow will be extended to larger group of patients with varying anatomy and cervical pathology, in whom traditional or commercial approaches have failed,” the researchers concluded. “This study has implications for the rapid production of personalised orthoses which can help reduce patient waiting time, improve patient compliance, reduce pain and reduce further deterioration. The workflow could form the basis for an integrated process, whereby a single hospital visit results in a bespoke orthosis optimised and personalised for each patient.”
Frequently Asked Questions
1. How much faster is 3D printing for orthoses compared to traditional methods?
3D printing can reduce the production time from approximately 6 weeks with traditional methods to just 72 hours (3 days). Traditional orthotics require 4-5 separate patient appointments for assessment, measurement, evaluation, adjustment, and final supply, whereas the 3D printing workflow can potentially be completed in a single hospital visit with the patient leaving with their orthosis the following day.
2. What 3D scanning technology was used in this study?
The researchers used a handheld Artec EVA 3D scanner to capture the patient’s head geometry while held in a corrected position. The scan data was then processed using Artec Studio 12 software and validated against actual measurements to ensure accuracy.
3. What materials were used to 3D print the cervical collars?
The first prototype was printed using semi-flexible Nylon 12, but was deemed too close-fitting. The subsequent three prototypes were printed using UV-stable ASA (acrylonitrile styrene acrylate) material, which was deemed the most appropriate for this medical application due to its durability, weather resistance, and stability under sunlight exposure.
4. What are the main advantages of 3D printed orthoses for patients?
The key benefits include: significantly faster production time (days vs weeks), fully customized fit based on patient-specific anatomy, ability to iterate designs quickly based on feedback, porous patterns for better ventilation and reduced weight, improved comfort levels, and better clinical outcomes including reduced pain, improved swallowing ability, wider field of vision, and improved posture.
5. How much does a 3D printed cervical collar cost compared to traditional orthoses?
In this study, the total cost of the 3D printed collar was £325 compared to an estimated £350 for a conventionally manufactured one. While the cost savings are modest (£25), the real value lies in the dramatic time savings, customization benefits, and improved patient outcomes rather than pure cost reduction.
6. Can this 3D printing workflow be used for other types of orthoses?
Yes, the researchers plan to extend this workflow to larger groups of patients with varying anatomy and cervical pathology. The digital workflow using 3D scanning, biomimetic design, and additive manufacturing is applicable to other types of orthoses and prosthetics, particularly for patients with atypical anatomy or complex clinical needs where traditional approaches have failed.
7. What software was used in the design process?
The workflow utilized multiple software tools: Artec Studio 12 for processing scan data, Houdini for developing the design process and workflow, and finite element analysis (FEA) solvers for design optimization and stress analysis of the orthosis structure.
8. How does the porous pattern benefit the orthosis?
The porous pattern generated using deformation energy mapping provides several benefits: improved ventilation and breathability for patient comfort, reduced weight of the final orthosis, lower material costs, and aesthetic improvements. The pattern is algorithmically generated based on stress analysis to maintain structural integrity while maximizing these benefits.
Discuss this and other 3D printing topics at 3DPrintBoard.com or share your thoughts below.
Related: Digital Survey Technology & 3D Printing Used to Create Model of Ancient Mayan Ac · DiveDesign & Bionic Pets: 3D Printing Custom Prosthetics for Dogs, Ducks, and Mo · 3D Printing for Mechanical Metamaterials: Pseudo-Mechanism Design & Multistable
Frequently Asked Questions
What should I look for in a 3D printer?
Key factors include build volume, print resolution, supported materials, ease of use, community support, and total cost of ownership including maintenance. Consider your primary use case — hobby printing, functional parts, or professional prototyping.
How much does a good 3D printer cost?
Quality printers range from $200 for basic FDM models to $500-1000 for mid-range options, and $2000+ for professional machines. The best value typically sits in the $300-800 range for most users.
📌 Related Articles
- Best 3D Printer Upgrades That Actually Improve Print Quality: Complete 2026 Guide
- Prusa Research Mini+ vs Prusa MK4: Full Specs Comparison & Buyer’s Guide
- Best Budget 3D Printer Upgrades That Actually Improve Print Quality: Belts, Springs, Hotends & More
- Bambu Lab A1 vs Elegoo Centauri Carbon: Full Specs Comparison & Buyer’s Guide
- Creality Creality Ender 3 V3 Plus vs Creality Ender 3 Pro: Full Specs Comparison & Buyer’s Guide