Quick Answer: Can 3D Printing Replace Soft Tooling?
Yes, 3D printing is increasingly replacing traditional soft tooling for prototyping and short-run production. Advantages include faster turnaround times (days vs weeks), lower costs for small batches (up to 50% savings), and the ability to create complex geometries impossible with silicone molds. While 3D-printed molds currently have shorter lifespans (20-500 shots vs 100-2000+ for soft tooling), rapid advancements in high-performance resins and materials are closing this gap rapidly.
Introduction: The Evolving Landscape of Tooling
In previous articles, we’ve discussed the benefits that 3D printing brings to tools for injection molding, die casting and forging. The technology also has its place in complementing or supplanting soft tooling, also referred to as rubber molding, silicone molding, room-temperature vulcanized (RTV) molding, or urethane casting.
As manufacturing evolves, the decision between traditional soft tooling and 3D-printed alternatives has become increasingly nuanced. Both approaches offer distinct advantages depending on batch size, material requirements, lead time, and complexity of the final part. Understanding these trade-offs is essential for manufacturers and product developers looking to optimize their production workflows.
Understanding Soft Tooling
Unlike hard tooling, made up of an aluminum or steel mold, soft tooling is comprised of silicone, urethane or other flexible materials and is used to produce parts with material properties that are more akin to a final injection molded material. This process is sometimes called RTV molding due to the fact that it can be performed at room temperature, unlike injection molding, which requires melting plastic pellets. Soft molds are usually manually injected with a given material through a gravity-fed tube.
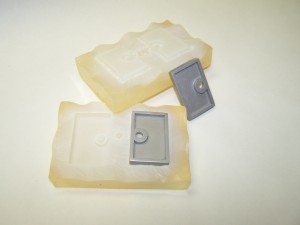
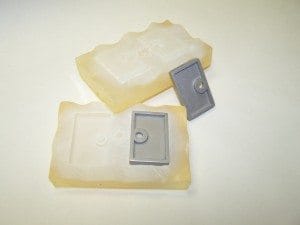
Traditionally made soft tooling. Image courtesy of the Technology House.
Rubber molding is often used as a bridge between the prototyping phase and injection molded parts, providing material properties that are more akin to the final injection molded material but at a lower cost than hard tooling that will be used for end production. Moreover, it can be used to produce limited runs of final parts while hard tooling is being made. While soft tooling is typically more economical for smaller batch sizes, it can’t survive as many shots as a metal mold. Soft tooling may be utilized in any of the following circumstances:
- Properties of the final production material must be evaluated
- Quantity exceeds economical prototyping capacity
- A trial batch is necessary before production
- The design is not ready for production tooling
- Only small production batches (tens to hundreds) of items are required
Soft Tooling vs. 3D Printing: A Detailed Comparison
| Factor | Traditional Soft Tooling | 3D Printed Tooling |
|---|---|---|
| Lead Time | 5-15 days (including master pattern creation) | 1-3 days (direct printing) |
| Setup Cost | $500-$5,000+ | $50-$2,000 |
| Mold Lifespan | 100-2,000+ shots (depending on material) | 20-500 shots (material-dependent) |
| Part Detail | High, but limited by master pattern | Very high (down to 1 micron with micro AM) |
| Temperature Resistance | Up to 200-250°C (silicone) | Up to 350°C with high-temp resins |
| Design Flexibility | Moderate (undercuts require special handling) | Excellent (complex geometries, internal features) |
| Best For | Medium batches (50-500 parts), functional testing | Rapid prototyping, very low batches, micro features |
How 3D Printing Revolutionizes Tooling Production
3D printing is already used today in the fabrication of soft tools. A prototype may be made with stereolithography, digital light processing or some other high-resolution 3D printing technology, like material jetting (e.g., PolyJet from Stratasys, MultiJet Printing from 3D Systems, etc.), before a flexible silicone mold is made around the prototype. The right urethane is then selected to be injected into the mold to create a part.
A 3D-printed mold used for urethane casting. Image courtesy of 3D Systems.
The real game-changer comes when 3D printing creates molds directly, eliminating the intermediate silicone casting step entirely. Kevin Klotz, Sr. Project Engineer MGS Mfg. Group, for instance, told 3D Hubs that MGS uses 3D printing to produce molds directly, saying, “Sometimes it’s not so much the cost of a 3D printed tool insert verses a soft tool version, it is that we can’t produce the detail in the soft tool without, for instance, applying Electrical Discharge Machining (EDM) techniques. Somos PerFORM allows for the creation of detail that otherwise could not be made and to make it in less time.”
This approach offers several key advantages:
- Dramatically Reduced Lead Times – What once took 5-15 days can now be accomplished in 24-72 hours
- Lower Tooling Costs – Eliminating silicone materials and labor reduces costs by 30-70%
- Enhanced Detail – High-resolution printers achieve features down to 10-50 microns
- Design Iteration Speed – Multiple design iterations can be tested in the time it would take to create one traditional soft mold
- No Master Pattern Required – Direct mold production eliminates an entire production step
3D Printing Technologies for Tooling
Not all 3D printing technologies are suitable for tooling applications. The choice depends on resolution requirements, mold lifespan needs, temperature resistance, and cost constraints. Below is a breakdown of the most relevant technologies.
| Technology | Resolution | Typical Mold Life | Temperature Resistance | Cost Range | Best Use Case |
|---|---|---|---|---|---|
| Stereolithography (SLA) | 25-100 microns | 50-200 shots | 200-250°C | $500-$5,000/mold | General prototyping, functional parts |
| Digital Light Processing (DLP) | 50-100 microns | 50-150 shots | 200-250°C | $400-$4,000/mold | Medium detail, cost-sensitive projects |
| Material Jetting (PolyJet/MJP) | 16-30 microns | 20-100 shots | 150-200°C | $1,000-$8,000/mold | High-detail molds, surface finish critical |
| Carbon CLIP | 25-75 microns | 100-500 shots | 250-300°C | $800-$6,000/mold | Production-grade molds, high durability |
| Micro AM (DLP Lithography) | 1-10 microns | 20-1,000 shots* | Up to 350°C | $2,000-$15,000/mold | Microfluidics, medical devices, precision parts |
*Developing technology, lifespan rapidly improving
Micro-Scale Innovations: Pushing the Boundaries
Recently, Israeli startup Nanofabrica has deployed its micro additive manufacturing technology to 3D print micro molds, dubbing the process “Direct Rapid Soft Tooling”. Nanofabrica’s Terra 250 AM system is an “ultra-high” resolution DLP machine that relies on semiconductor lithography to print layers as fine as 1 micron. The company, which recently raised $4 million in a financing round led by Microsoft’s M12 venture fund, was able to inject polypropylene, polyethylene and ABS into micro molds 3D printed with the Terra 250 AM system.
Molds lasted 20 shots at pressures of 400 bar at 230°C. Within the coming months, Nanofabrica is aiming to optimize the technology to create molds that can last 1,000 shots at temperatures of 350°C and pressures of 800 bar. So far, soft tooling that small was limited to research efforts, with a team from the Technical University of Denmark, printing micro mold inserts, as shown in the video below.
This micro-scale capability opens doors previously inaccessible to traditional manufacturing. Applications include microfluidics, medical devices with micro-features, optical components, and precision mechanical parts where tolerances tighter than 50 microns are required. The ability to iterate quickly at this scale is particularly valuable for research and development, where multiple design iterations may be necessary before finalizing a part.
Macro-Scale Developments: Competing Directly with Injection Molding
At the macroscale, now that polymer 3D printers are beginning to achieve the throughput and material properties possible with silicone molding, they are able to compete directly. In particular, companies like Carbon are working to develop materials that most closely resemble material properties used in injection molding, while AddiFab and Collider have learned how to combine injection molding with 3D printing in unique ways that allow for the use of existing injection molding plastics.
Carbon’s CLIP (Continuous Liquid Interface Production) technology produces parts with mechanical properties approaching those of injection molded ABS and polycarbonate. With build speeds significantly faster than traditional SLA and materials designed specifically for tooling applications, Carbon’s approach enables the production of molds capable of hundreds of shots at pressures and temperatures previously thought impossible for 3D-printed tools.
Meanwhile, AddiFab’s Freeform Injection Molding (FIM) technology takes a different approach. They use 3D-printed soluble molds that are injected with traditional thermoplastics, after which the mold is dissolved. This allows for the use of any injection-moldable material without the constraints of 3D-printed mold materials. The result is parts with authentic injection-molded properties, produced in quantities ranging from 1 to 10,000 pieces with minimal tooling investment.
When to Choose 3D Printing Over Soft Tooling
The decision between 3D-printed tooling and traditional soft tooling depends on several factors. Here’s a framework for making the right choice:
Choose 3D Printing When:
- Speed is Critical – You need parts within 48-72 hours
- Batch Size is Very Small – Less than 50 parts
- Design is Unstable – Expecting multiple design iterations
- Complex Geometry – Undercuts, internal features, or micro-features required
- Master Pattern Production Would Be Costly – Intricate designs that would require CNC machining or EDM
- Proof of Concept – Demonstrating feasibility before committing to larger-scale tooling
Choose Traditional Soft Tooling When:
- Batch Size is Moderate – 50-500 parts
- Material Properties are Critical – Need true production-grade materials
- Mold Longevity Matters – Need more than 200 shots per mold
- Surface Finish is Paramount – Class A surface requirements
- Cost Per Part is a Priority – Larger batches benefit from lower per-part costs
- Regulatory Requirements – Certain industries have validated processes for silicone/urethane molding
The Future: Hybrid Approaches and Material Innovations
The future of tooling lies not in one technology replacing another, but in intelligent combinations of approaches tailored to specific needs. Hybrid solutions are emerging that leverage the strengths of both 3D printing and traditional methods. For example:
- 3D-Printed Metal Inserts – Using metal 3D printing to create durable mold inserts within silicone molds
- Hybrid Mold Systems – Combining 3D-printed cores with traditionally machined cavities
- Multi-Material Molds – Printing molds with variable material properties optimized for different regions of the part
Material innovations are driving these capabilities forward. New high-temperature resins, ceramic-filled polymers, and composite materials are extending mold lifespans while maintaining fine details. At the same time, improvements in printing speeds and build volumes are making 3D-printed tooling viable for larger batches and bigger parts than ever before.
Cost Considerations: Beyond the Tooling Price
When evaluating the economics of 3D printing versus soft tooling, it’s important to look beyond the initial tooling cost. A comprehensive cost analysis should include:
- Time-to-Market Costs – What’s the value of getting products to market faster?
- Inventory Costs – Can smaller batch sizes reduce warehousing expenses?
- Design Revision Costs – How expensive are design changes with each method?
- Per-Part Costs – Does lower tooling cost justify higher per-part costs for larger batches?
- Quality Costs – What are the costs of rework or rejects from each method?
- Intellectual Property – Does faster iteration provide competitive advantages worth quantifying?
In many cases, the total cost of ownership favors 3D printing even when tooling costs are comparable, due to faster iteration cycles and reduced inventory requirements.
Industry Applications and Case Studies
The impact of 3D-printed tooling is being felt across numerous industries:
Medical Device Manufacturing
Medical device companies use 3D-printed tooling to create sterile, biocompatible parts for testing and clinical trials. The ability to quickly produce patient-specific devices and surgical guides is revolutionizing personalized medicine.
Automotive Prototyping
Automotive manufacturers use 3D-printed tools for rapid prototyping of interior components, clips, and fasteners. See also: Best Budget 3D Printer Upgrades That Actually Impr…. This accelerates the design validation process and reduces the time required to bring new vehicle models to market.
Consumer Electronics
From smartphone enclosures to wearable devices, consumer electronics companies rely on 3D-printed tooling for form and fit testing. The ability to create complex geometries with fine details is particularly valuable for intricate electronic components.
Aerospace and Defense
Aerospace applications benefit from 3D-printed tooling for creating specialized components that would be prohibitively expensive to manufacture using traditional methods. The technology also enables rapid iteration on prototypes for new aircraft systems.
Frequently Asked Questions
What is the main difference between soft tooling and 3D-printed tooling?
Soft tooling uses silicone or urethane molds created from a master pattern, while 3D-printed tooling creates molds directly from digital files without requiring a master pattern. This makes 3D printing faster (1-3 days vs 5-15 days) and eliminates an entire production step, though traditional soft tooling typically offers longer mold life (100-2000+ shots vs 20-500 shots for 3D-printed tools).
How long do 3D-printed molds last?
Mold lifespan varies significantly based on technology, material, and operating conditions. Standard SLA/DLP molds typically last 20-200 shots, while high-end materials like Carbon’s or specialized high-temperature resins can achieve 100-500 shots. Emerging micro AM technologies are pushing these limits further, with Nanofabrica targeting 1,000-shot molds at temperatures up to 350°C.
Can 3D-printed tools withstand injection molding pressures?
Yes, many 3D-printed tools can withstand injection molding pressures, but the limits depend on the material and printing technology. High-performance resins can handle pressures of 400-800 bar at temperatures up to 350°C, though these capabilities are at the cutting edge. For lower-volume applications or lower-pressure materials like urethane casting, even standard printed molds perform well.
Is 3D printing always cheaper than soft tooling?
Not always. For very small batches (under 50 parts), 3D printing is typically 30-70% cheaper. For moderate batches (50-500 parts), costs are comparable and depend on design complexity. For larger batches (500+ parts), traditional soft tooling often wins on a per-part basis due to lower mold costs spread across more units. However, the total cost of ownership—including time-to-market and iteration costs—often favors 3D printing even when tooling prices are similar.
What materials can be used with 3D-printed molds?
3D-printed molds can accommodate a wide range of materials. For urethane casting and RTV molding, virtually any casting material works. For injection molding, materials include polypropylene, polyethylene, ABS, polycarbonate, and many other thermoplastics. The limitation is typically the mold’s heat resistance rather than the injected material itself, so high-temperature resins unlock access to more demanding plastics.
Can I use 3D-printed tools for production runs?
For short-run production (up to a few hundred parts), 3D-printed tools are increasingly viable, especially for non-critical applications or products that may be updated frequently. For larger production runs or applications requiring tight tolerances and consistent quality over thousands of parts, traditional hard tooling (aluminum or steel) remains the standard. However, the boundary is shifting as materials and technologies improve.
How do I choose between SLA, DLP, and other 3D printing technologies for tooling?
The choice depends on your requirements: SLA offers excellent all-around performance with good resolution and durability; DLP provides faster build speeds at slightly lower resolution; Material jetting delivers the highest resolution for ultra-fine details; Carbon’s CLIP technology offers the best combination of speed and durability; and micro AM technologies are essential for features below 25 microns. Consider your required detail level, mold lifespan needs, and budget when selecting a technology.
Conclusion: The Right Tool for the Right Job
3D printing is not replacing soft tooling entirely, but it is providing compelling alternatives that, in many cases, offer faster turnaround times, lower costs, and enhanced design flexibility. The key is understanding your specific requirements—batch size, material needs, lead time, and part complexity—and choosing the approach that best serves those needs.
As materials continue to improve and printing speeds increase, the gap between 3D-printed and traditional tooling will continue to narrow. Forward-thinking manufacturers are already embracing a hybrid approach, using each technology where it excels to optimize their entire production workflow. For those who understand these nuances, the result is faster innovation, reduced costs, and greater flexibility in bringing products to market.
Where to Buy Filament
Disclosure: Some of the links below are affiliate links. If you make a purchase, we may earn a commission at no extra cost to you. This helps support this site.
- ABS: Hatchbox
- Polypropylene: Amazon Selection
- High-Temp Resin: Amazon Selection
Looking for Quick Answer: Can 3D Printing Replace Soft Tooling?
Yes, 3D printing is increasingly replacing traditional soft tooling for prototyping and short-run production. Advantages include faster turnaround times (days vs weeks), lower costs for small batches (up to 50% savings), and the ability to create complex geometries impossible with silicone molds. While 3D-printed molds currently have shorter lifespans (20-500 shots vs 100-2000+ for soft tooling), rapid advancements in high-performance resins and materials are closing this gap rapidly.Introduction: The Evolving Landscape of Tooling
In previous articles, we’ve discussed the benefits that 3D printing brings to tools for injection molding, die casting and forging. The technology also has its place in complementing or supplanting soft tooling, also referred to as rubber molding, silicone molding, room-temperature vulcanized (RTV) molding, or urethane casting.
As manufacturing evolves, the decision between traditional soft tooling and 3D-printed alternatives has become increasingly nuanced. Both approaches offer distinct advantages depending on batch size, material requirements, lead time, and complexity of the final part. Understanding these trade-offs is essential for manufacturers and product developers looking to optimize their production workflows.
Understanding Soft Tooling
Unlike hard tooling, made up of an aluminum or steel mold, soft tooling is comprised of silicone, urethane or other flexible materials and is used to produce parts with material properties that are more akin to a final injection molded material. This process is sometimes called RTV molding due to the fact that it can be performed at room temperature, unlike injection molding, which requires melting plastic pellets. Soft molds are usually manually injected with a given material through a gravity-fed tube.Traditionally made soft tooling. Image courtesy of the Technology House.
Rubber molding is often used as a bridge between the prototyping phase and injection molded parts, providing material properties that are more akin to the final injection molded material but at a lower cost than hard tooling that will be used for end production. Moreover, it can be used to produce limited runs of final parts while hard tooling is being made. While soft tooling is typically more economical for smaller batch sizes, it can’t survive as many shots as a metal mold. Soft tooling may be utilized in any of the following circumstances:
Properties of the final production material must be evaluated
Quantity exceeds economical prototyping capacity
A trial batch is necessary before production
The design is not ready for production tooling
Only small production batches (tens to hundreds) of items are requiredSoft Tooling vs. 3D Printing: A Detailed Comparison
Factor
Traditional Soft Tooling
3D Printed ToolingLead Time
5-15 days (including master pattern creation)
1-3 days (direct printing)Setup Cost
$500-$5,000+
$50-$2,000Mold Lifespan
100-2,000+ shots (depending on material)
20-500 shots (material-dependent)Part Detail
High, but limited by master pattern
Very high (down to 1 micron with micro AM)Temperature Resistance
Up to 200-250°C (silicone)
Up to 350°C with high-temp resinsDesign Flexibility
Moderate (undercuts require special handling)
Excellent (complex geometries, internal features)Best For
Medium batches (50-500 parts), functional testing
Rapid prototyping, very low batches, micro featuresHow 3D Printing Revolutionizes Tooling Production
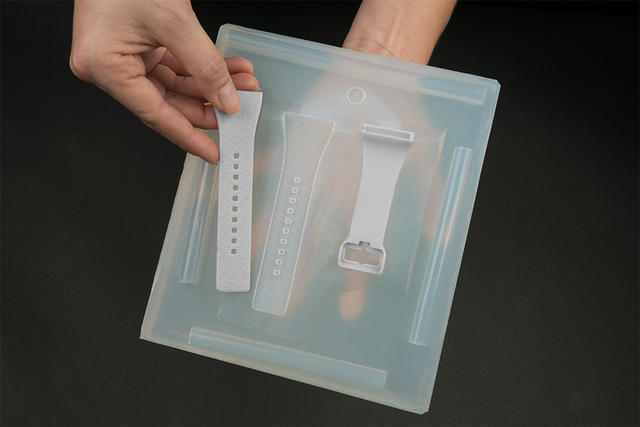
3D printing is already used today in the fabrication of soft tools. A prototype may be made with stereolithography, digital light processing or some other high-resolution 3D printing technology, like material jetting (e.g., PolyJet from Stratasys, MultiJet Printing from 3D Systems, etc.), before a flexible silicone mold is made around the prototype. The right urethane is then selected to be injected into the mold to create a part.A 3D-printed mold used for urethane casting. Image courtesy of 3D Systems.
The real game-changer comes when 3D printing creates molds directly, eliminating the intermediate silicone casting step entirely. Kevin Klotz, Sr. Project Engineer MGS Mfg. Group, for instance, told 3D Hubs that MGS uses 3D printing to produce molds directly, saying, “Sometimes it’s not so much the cost of a 3D printed tool insert verses a soft tool version, it is that we can’t produce the detail in the soft tool without, for instance, applying Electrical Discharge Machining (EDM) techniques. Somos PerFORM allows for the creation of detail that otherwise could not be made and to make it in less time.”
This approach offers several key advantages:Dramatically Reduced Lead Times – What once took 5-15 days can now be accomplished in 24-72 hours
Lower Tooling Costs – Eliminating silicone materials and labor reduces costs by 30-70%
Enhanced Detail – High-resolution printers achieve features down to 10-50 microns
Design Iteration Speed – Multiple design iterations can be tested in the time it would take to create one traditional soft mold
No Master Pattern Required – Direct mold production eliminates an entire production step3D Printing Technologies for Tooling
Not all 3D printing technologies are suitable for tooling applications. The choice depends on resolution requirements, mold lifespan needs, temperature resistance, and cost constraints. Below is a breakdown of the most relevant technologies.Technology
Resolution
Typical Mold Life
Temperature Resistance
Cost Range
Best Use CaseStereolithography (SLA)
25-100 microns
50-200 shots
200-250°C
$500-$5,000/mold
General prototyping, functional partsDigital Light Processing (DLP)
50-100 microns
50-150 shots
200-250°C
$400-$4,000/mold
Medium detail, cost-sensitive projectsMaterial Jetting (PolyJet/MJP)
16-30 microns
20-100 shots
150-200°C
$1,000-$8,000/mold
High-detail molds, surface finish criticalCarbon CLIP
25-75 microns
100-500 shots
250-300°C
$800-$6,000/mold
Production-grade molds, high durabilityMicro AM (DLP Lithography)
1-10 microns
20-1,000 shots*
Up to 350°C
$2,000-$15,000/mold
Microfluidics, medical devices, precision parts*Developing technology, lifespan rapidly improving
Micro-Scale Innovations: Pushing the Boundaries
Recently, Israeli startup Nanofabrica has deployed its micro additive manufacturing technology to 3D print micro molds, dubbing the process “Direct Rapid Soft Tooling”. Nanofabrica’s Terra 250 AM system is an “ultra-high” resolution DLP machine that relies on semiconductor lithography to print layers as fine as 1 micron. The company, which recently raised $4 million in a financing round led by Microsoft’s M12 venture fund, was able to inject polypropylene, polyethylene and ABS into micro molds 3D printed with the Terra 250 AM system.Molds lasted 20 shots at pressures of 400 bar at 230°C. Within the coming months, Nanofabrica is aiming to optimize the technology to create molds that can last 1,000 shots at temperatures of 350°C and pressures of 800 bar. So far, soft tooling that small was limited to research efforts, with a team from the Technical University of Denmark, printing micro mold inserts, as shown in the video below.
A Soft Tooling Process Chain for Injection Molding of a 3D Component with Micro Pillars
This micro-scale capability opens doors previously inaccessible to traditional manufacturing. Applications include microfluidics, medical devices with micro-features, optical components, and precision mechanical parts where tolerances tighter than 50 microns are required. The ability to iterate quickly at this scale is particularly valuable for research and development, where multiple design iterations may be necessary before finalizing a part.
Macro-Scale Developments: Competing Directly with Injection Molding
At the macroscale, now that polymer 3D printers are beginning to achieve the throughput and material properties possible with silicone molding, they are able to compete directly. In particular, companies like Carbon are working to develop materials that most closely resemble material properties used in injection molding, while AddiFab and Collider have learned how to combine injection molding with 3D printing in unique ways that allow for the use of existing injection molding plastics.
Carbon’s CLIP (Continuous Liquid Interface Production) technology produces parts with mechanical properties approaching those of injection molded ABS and polycarbonate. With build speeds significantly faster than traditional SLA and materials designed specifically for tooling applications, Carbon’s approach enables the production of molds capable of hundreds of shots at pressures and temperatures previously thought impossible for 3D-printed tools.
Meanwhile, AddiFab’s Freeform Injection Molding (FIM) technology takes a different approach. They use 3D-printed soluble molds that are injected with traditional thermoplastics, after which the mold is dissolved. This allows for the use of any injection-moldable material without the constraints of 3D-printed mold materials. The result is parts with authentic injection-molded properties, produced in quantities ranging from 1 to 10,000 pieces with minimal tooling investment.
When to Choose 3D Printing Over Soft Tooling
The decision between 3D-printed tooling and traditional soft tooling depends on several factors. Here’s a framework for making the right choice:
Choose 3D Printing When:Speed is Critical – You need parts within 48-72 hours
Batch Size is Very Small – Less than 50 parts
Design is Unstable – Expecting multiple design iterations
Complex Geometry – Undercuts, internal features, or micro-features required
Master Pattern Production Would Be Costly – Intricate designs that would require CNC machining or EDM
Proof of Concept – Demonstrating feasibility before committing to larger-scale toolingChoose Traditional Soft Tooling When:
Batch Size is Moderate – 50-500 parts
Material Properties are Critical – Need true production-grade materials
Mold Longevity Matters – Need more than 200 shots per mold
Surface Finish is Paramount – Class A surface requirements
Cost Per Part is a Priority – Larger batches benefit from lower per-part costs
Regulatory Requirements – Certain industries have validated processes for silicone/urethane moldingThe Future: Hybrid Approaches and Material Innovations
The future of tooling lies not in one technology replacing another, but in intelligent combinations of approaches tailored to specific needs. Hybrid solutions are emerging that leverage the strengths of both 3D printing and traditional methods. For example:3D-Printed Metal Inserts – Using metal 3D printing to create durable mold inserts within silicone molds
Hybrid Mold Systems – Combining 3D-printed cores with traditionally machined cavities
Multi-Material Molds – Printing molds with variable material properties optimized for different regions of the partMaterial innovations are driving these capabilities forward. New high-temperature resins, ceramic-filled polymers, and composite materials are extending mold lifespans while maintaining fine details. At the same time, improvements in printing speeds and build volumes are making 3D-printed tooling viable for larger batches and bigger parts than ever before.
Cost Considerations: Beyond the Tooling Price
When evaluating the economics of 3D printing versus soft tooling, it’s important to look beyond the initial tooling cost. A comprehensive cost analysis should include:Time-to-Market Costs – What’s the value of getting products to market faster?
Inventory Costs – Can smaller batch sizes reduce warehousing expenses?
Design Revision Costs – How expensive are design changes with each method?
Per-Part Costs – Does lower tooling cost justify higher per-part costs for larger batches?
Quality Costs – What are the costs of rework or rejects from each method?
Intellectual Property – Does faster iteration provide competitive advantages worth quantifying?In many cases, the total cost of ownership favors 3D printing even when tooling costs are comparable, due to faster iteration cycles and reduced inventory requirements.
Industry Applications and Case Studies
The impact of 3D-printed tooling is being felt across numerous industries:
Medical Device Manufacturing
Medical device companies use 3D-printed tooling to create sterile, biocompatible parts for testing and clinical trials. The ability to quickly produce patient-specific devices and surgical guides is revolutionizing personalized medicine.
Automotive Prototyping
Automotive manufacturers use 3D-printed tools for rapid prototyping of interior components, clips, and fasteners. See also: Best Budget 3D Printer Upgrades That Actually Impr…. This accelerates the design validation process and reduces the time required to bring new vehicle models to market.
Consumer Electronics
From smartphone enclosures to wearable devices, consumer electronics companies rely on 3D-printed tooling for form and fit testing. The ability to create complex geometries with fine details is particularly valuable for intricate electronic components.
Aerospace and Defense
Aerospace applications benefit from 3D-printed tooling for creating specialized components that would be prohibitively expensive to manufacture using traditional methods. The technology also enables rapid iteration on prototypes for new aircraft systems.
Frequently Asked Questions
What is the main difference between soft tooling and 3D-printed tooling?
Soft tooling uses silicone or urethane molds created from a master pattern, while 3D-printed tooling creates molds directly from digital files without requiring a master pattern. This makes 3D printing faster (1-3 days vs 5-15 days) and eliminates an entire production step, though traditional soft tooling typically offers longer mold life (100-2000+ shots vs 20-500 shots for 3D-printed tools).
How long do 3D-printed molds last?
Mold lifespan varies significantly based on technology, material, and operating conditions. Standard SLA/DLP molds typically last 20-200 shots, while high-end materials like Carbon’s or specialized high-temperature resins can achieve 100-500 shots. Emerging micro AM technologies are pushing these limits further, with Nanofabrica targeting 1,000-shot molds at temperatures up to 350°C.
Can 3D-printed tools withstand injection molding pressures?
Yes, many 3D-printed tools can withstand injection molding pressures, but the limits depend on the material and printing technology. High-performance resins can handle pressures of 400-800 bar at temperatures up to 350°C, though these capabilities are at the cutting edge. For lower-volume applications or lower-pressure materials like urethane casting, even standard printed molds perform well.
Is 3D printing always cheaper than soft tooling?
Not always. For very small batches (under 50 parts), 3D printing is typically 30-70% cheaper. For moderate batches (50-500 parts), costs are comparable and depend on design complexity. For larger batches (500+ parts), traditional soft tooling often wins on a per-part basis due to lower mold costs spread across more units. However, the total cost of ownership—including time-to-market and iteration costs—often favors 3D printing even when tooling prices are similar.
What materials can be used with 3D-printed molds?
3D-printed molds can accommodate a wide range of materials. For urethane casting and RTV molding, virtually any casting material works. For injection molding, materials include polypropylene, polyethylene, ABS, polycarbonate, and many other thermoplastics. The limitation is typically the mold’s heat resistance rather than the injected material itself, so high-temperature resins unlock access to more demanding plastics.
Can I use 3D-printed tools for production runs?
For short-run production (up to a few hundred parts), 3D-printed tools are increasingly viable, especially for non-critical applications or products that may be updated frequently. For larger production runs or applications requiring tight tolerances and consistent quality over thousands of parts, traditional hard tooling (aluminum or steel) remains the standard. However, the boundary is shifting as materials and technologies improve.
How do I choose between SLA, DLP, and other 3D printing technologies for tooling?
The choice depends on your requirements: SLA offers excellent all-around performance with good resolution and durability; DLP provides faster build speeds at slightly lower resolution; Material jetting delivers the highest resolution for ultra-fine details; Carbon’s CLIP technology offers the best combination of speed and durability; and micro AM technologies are essential for features below 25 microns. Consider your required detail level, mold lifespan needs, and budget when selecting a technology.
Conclusion: The Right Tool for the Right Job
3D printing is not replacing soft tooling entirely, but it is providing compelling alternatives that, in many cases, offer faster turnaround times, lower costs, and enhanced design flexibility. The key is understanding your specific requirements—batch size, material needs, lead time, and part complexity—and choosing the approach that best serves those needs.
As materials continue to improve and printing speeds increase, the gap between 3D-printed and traditional tooling will continue to narrow. Forward-thinking manufacturers are already embracing a hybrid approach, using each technology where it excels to optimize their entire production workflow. For those who understand these nuances, the result is faster innovation, reduced costs, and greater flexibility in bringing products to market.Where to Buy Filament? Check the best deals on Amazon:
These links go to Amazon with our affiliate tag. If you prefer to support local retailers or buy directly from manufacturers, we encourage that as well!
📌 Related Articles
- Best 3D Printer Upgrades That Actually Improve Print Quality: Complete 2026 Guide
- Best Budget 3D Printer Upgrades That Actually Improve Print Quality: Belts, Springs, Hotends & More
- ABS 3D Printing Settings Guide: Temperature, Enclosure, and Cooling for Strong Parts
- Prusa Research Mini+ vs Prusa MK4: Full Specs Comparison & Buyer’s Guide
- Bambu Lab P1S vs Bambu Lab P2S: Full Specs Comparison & Buyer’s Guide